
Garage Door Spring Replacement Guide – How to Tutorial *Updated 2025*

The garage door is the heaviest movable object of your home, weighing in the neighborhood of 400+ pounds. We put our trust in the rollers, tracks, and springs when the door cycles up and down, often with a car or a person underneath as it opens. The component that performs most of the work is a spring, and it does so under hundreds of pounds of torsion. Unfortunately these springs can often break, rendering the door immovable and trapping a car either inside or outside the garage.
For everything you need for your garage door spring replacement, we recommend the all-in-one bundle kit: www.garagedoornation.com/products/torsion-springs-kit

When the screws of the springs are loosened, the person repairing the springs is in control of all the torsion — a process that can be intimidating to a novice DIY repairer.
The truth is, garage door springs can be repaired by a homeowner, provided all safety guidelines are followed and the proper steps are taken as required by the spring manufacturer. Getting comfortable with using a winding bar and handling the springs' torsion is important as it will allow for balancing, adjusting, and repair as needed without the need to call a repair company and adjust to their schedule.

Make no mistake, changing garage door springs can be dangerous and an overhead door company should be called if the task is out of one’s comfort zone. When winding or unwinding the springs, they can snap without warning, which can result in serious injury.
Garage Door Spring Replacement Guide
Here are the basics of garage spring repair for those looking to tackle the task:
One Spring or Two
The torsion spring sits above the garage on the interior, centered on an object called the torsion bar. Depending on the age of the garage door, the system can run on either a one- or two-spring system.
The solo system features one long spring that controls both the left and right sides of the garage door, winding and unwinding to either open or close the door. There are some disadvantages to the solo spring system — primarily the threat of the garage door crashing down if the piece snaps. Or, the opener’s motor will begin working harder as the spring gets older.

A dual system is located on the same torsion bar but features a left and right spring that controls each side of the garage door. The benefit of a dual spring is that it each spring is under less stress and pressure from controlling only half the door, and if one breaks, the door won't come crashing down.
It's generally recommended that if a solo system spring breaks, it's better to replace it with a dual-spring system as no major modifications or changes to the setup are required.
What's Needed?
The task of changing out the garage spring requires tools that are readily available. A 7/16” and 9/16” wrench are the only two sizes needed, as well as a couple pairs of vice grips and a step ladder.
Equipment that is mandatory though are winding bars, which help control the torsion as the spring is being installed and removed. Most quality spring suppliers will include the two torsion bars with purchase.

Choosing the Correct Replacement Spring
When purchasing a new spring, measurements from the old spring must be taken to ensure the proper replacement is used. Buying any spring can result in a door flying open from too much torsion or crashing down from too little. The measurements that need to be taken include the inside diameter of the existing spring as well as the length and the wire size.
We recommend watching this video for how to measure your garage door springs:
To calculate the wire size, measure 10 compressed coils and divide that length by 10. For instance 1-3/8” (1.375) would be a .1378 spring width or 2-1/2” would be a .250 spring. Having this information as well as the garage door height will help the supplier provide the correct spring system.
Prepping the Work Area
When changing springs, the garage door should be closed and the automatic opener in the ceiling unplugged to prevent accidental opening. A vice grip clamped on the door can prevent the springs from flinging the door upwards as it is being worked on.

Unwind Torsion From the Spring
If the spring has snapped, it will not need to be unwound. In a dual spring system with one spring broken, however, it is always recommended to remove and replace both units. The main part of unwinding the spring involves becoming comfortable with handling the torsion with the following steps:
- Knowing the spring – Dual garage door springs have two sides – a stationary end located near the center and a winding end towards the outside. The winding end contains a winding cone with numerous slots where the winding bars will be placed to loosen or tighten the spring.
- Setting the first winding bar - Make sure to wear safety glasses and work beside (not in front of) the spring for maximum safety. Set the first winding bar in the slot facing out until it clicks and move it up and down just a bit to get comfortable with the torsion. Hold the bar and loosen the 7/16” set screws so the spring can be loosened.
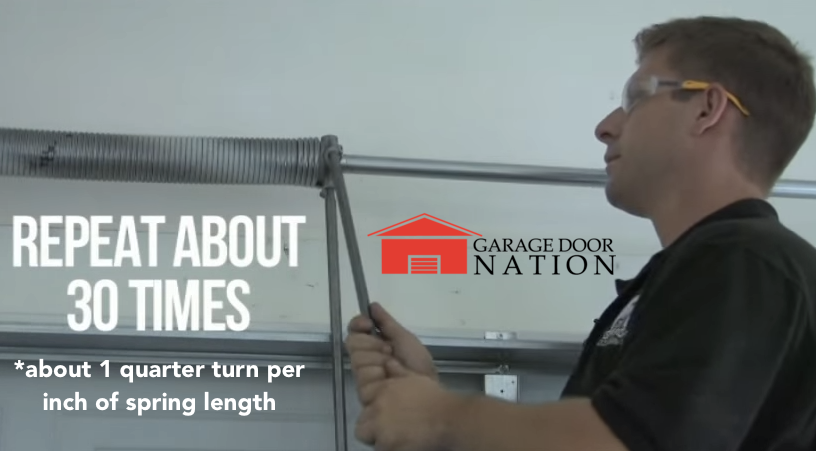
- Unwind – Bring the first winding bar down and keep it held in place. Set the second winding bar in the next slot up then remove the first bar. Bring the second winding bar down to complete two quarter turns. Repeat this process 30 times until the spring is out of torsion.
- Loosen Stationary Side – After removing the torsion from both sides of the spring, prepare them for removal by loosening the 9/16” bolts on the stationary sides of the springs.
Removing the Old Springs
After the springs have been fully unwound, they can be removed and replaced in a few easy steps:
- Mark the drum and shaft (torsion bar) – The drums are the two circular pieces on either side of the garage that the cables are wound around. Make a Sharpie mark on both the drum position and where it meets with the shaft will make for easier alignment when the new springs are attached.
- Remove cable – Unhook the cable from the drums and place it in a slot on the garage so it doesn't get damaged.
- Loosen drums – Take a 7/16” wrench and loosen the drums on both sides of the garage.
- Remove drums and springs – Once the drums are both loosened, the shaft can be pushed through on one side for removal of the drums, springs, and any bearings. Make sure to keep the bearings in case they aren't included with the new set; otherwise, toss the spring so it isn't stepped on later.
Install New Springs
Putting on the new springs largely involves doing everything that was just done to take them off:
- Red is RIGHT Wound, but goes on left side – One thing to remember with garage door torsion springs and end drums is that they have paint marks on the end for a reason. All the red pieces should go on the left side of the garage when looking up from the interior. So in this case, put all the pieces back on the shaft so when looking at them from left to right they go: red drum – red spring – center bearing – black spring – black drum.
- Set the Stationary Center – The centers of the springs need to be set in place before they are wound back tight. Make sure the center bearing is sitting on the lip of the bracket coming out from the garage wall and align the two springs while tightening them with a 9/16” wrench. To know how far out from the wall to place them, measure the distance of the shaft to the wall at each end and mimic it.
- Place Cable and Tighten Drum – Insert the cables back into the drums on each end and wind them until they're tight – making sure to realign with the previous black Sharpie marks. Push the drums tight against the end and tighten the 7/16” bolts. Next put some tension into the spring by spinning the shaft until the cable is tight. Keep that position by clamping a vice grip on the shaft and positioning it against the garage door so it won't move while tightening the springs. Follow that by tightening the second drum.

Tighten New Springs
A rule of thumb with springs is that four quarter turns equals a full revolution and the spring needs to be tightened a full revolution for every foot of door height (e.g. 7-1/2 foot door = 7 revolutions +2 (30 quarter turns).
One way to help remember how many turns have been completed is to paint a line down the width of the spring. As the spring reaches its tightening point, there will be 7-1/2 gaps marked out in the paint.
- Wind the Spring – This time use the winding bars upwards to tighten instead of loosen the spring. Place a winding bar at the bottom and bring it ¼ turn up. Place the second winding bar in the winding cone slot that is now at the bottom, then remove the first bar. Complete this process for the required amount of turns.
- Tighten the Set Screws – Pull the winding bar up a bit and tighten the set screws ¾ of a turn past tight. Complete the tightening process on the spring on the other side of the garage.
Checks, Balances, and Final Maneuvers
With both springs tightened, it is time to check the work. Remove the vice grips on the shaft and lift the door halfway. The door should stay in place wherever it is positioned. If it is too heavy, torsion needs to be added, whereas if it's too light, torsion needs to be taken away.
Two other things to check: Is there cable tension when the door is up? (There should be.) How far does the door rise when it's lifted? It should be flush with the door as over-travel adds extra tension to the spring and reduces the lifespan. All of these can be remedied by either winding or unwinding the springs, or in some cases purchasing a different size of spring.
Once the door is balanced the final steps involve pulling the cord to put the door back in auto mode, plugging in the opener and pushing the button to hook the door back up to the carriage. The springs can then be lubricated and should be ready for action.
It's an advanced DIY job, but repairing broken garage springs doesn't have to be as intimidating as people make it out to be.
For the full version, step-by-step on how to replace your garage springs, view this video:
Get Replacement Springs At Garage Door Nation!

You can get the replacement torsion springs you need right here at Garage Door Nation! You can input all your specs using our helpful Garage Door Spring Wizard! You can also get the springs you need as well as all the parts to complete your change out with our EXCLUSIVE garage door torsion spring repair kit!
You can save time AND money with Garage Door Nation, as all orders over $100.00 ship for FREE!
Need help finding springs? Contact us any time at support@garagedoornation.com!


